Một thư viện khác bạn cho bạn lựa chọn để tạo theme options, khác với NHP APF (Admin page framework) cung cấp nhiều tính năng hơn, không chỉ sử dụng trong việc tạo options mà bạn có thể tạo các trường trên widget..
Đầu tiên bạn tải thư viện APF tại: http://admin-page-framework.michaeluno.jp/
Bạn có thể kích hoạt plugin admin page hoặc chèn file thư viện vào theme/plugin của bạn, lưu ý: vui lòng chỉ thực hiện một trong hai cách nếu không bạn sẽ nhân bản thư viện và làm wordpress không hoạt động. Bởi vì thư viện APF đã cài sẵn trong plugin.
- Cách 1: Download plugin Admin Page Framework.
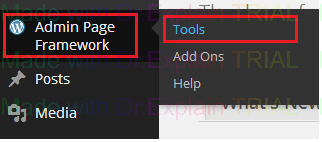
Truy cập menu "Admin Page Framework->Tools". Nhấn nút download.
- Cách 2: Chèn file thư viện trực tiếp trong code.
|
require_once( dirname( __FILE__ ) . '/admin-page-framework.min.php' );
|
Tạo trang options.
Kế thừa class AdminPageFramework.
|
//extending the framework admin factory class
class MyFirstPlugin extends AdminPageFramework {
//tell the framework what page to create
public function setUp() {
$this->setRootMenuPage( 'Settings' ); # set the top-level page, ie add a page to the Settings page
#add sub-menu pages
$this->addSubMenuItem(
array(
'title' => 'My First Page',
'page_slug' => 'my_first_page',
)
);
}
//Methods for Hooks, echo page content rule: do_{page slug} and it will be automatically gets called.
public function do_my_first_page() {
?>
<h3>Say Something</h3>
<p>This is my first admin page!</p>
<?php
}
}
//Instantiate the Class
new MyFirstPlugin;
|
Diễn giải:
- Phương thức setUp():
Phương thức này được định nghĩa trong code và được tự động gọi bởi hook 'wp_loaded'. Trong phương thức này chúng ta định nghĩa trang sẽ làm root menu để thêm sub items vào đó.
|
//under settings menu
$this->setRootMenuPage('Settings');
|
Tiếp đến thiết lập tiêu đề, cho trang.
Chú ý: Page slug chỉ nên chứa chữ cái, số, và ký tự gạch dưới '_'. Dấu chấm và gạch ngang nên tránh bởi vì tên slug sẽ là một phần của tên hàm callback.
|
public function setUp() {
// Create the root menu - specifies to which parent menu to add.
$this->setRootMenuPage( 'Settings' );
// Add the sub menus and the pages.
$this->addSubMenuItems(
array(
'title' => '1. My First Setting Page', // page and menu title
'page_slug' => 'my_first_settings_page' // page slug
)
);
}
|
Phương thức Callbacks:
* Ở đây chúng ta sử dụng 'do_+ page slug'
|
//Methods for Hooks, echo page content rule: do_{page slug} and it will be automatically gets called.
public function do_my_first_page() {
?>
<h3>Say Something</h3>
<p>This is my first admin page!</p>
<?php
}
|
* load_{page slug}
Phương thức này sẽ được kích hoạt khi page bắt đầu nạp.
|
public function load_my_first_forms( $oAdminPage ) { // load_{page slug}
// Our code goes here.
}
|
Tạo trường form:
Để tạo trường form bằng cách thiết lập cài đặt trường dạng mảng sử dụng phương thức addSettingFields trong hàm setUp hoặc callback load_{page slug}
|
$this->addSettingFields(
array( // Single text field
'field_id' => 'my_text_field',
'type' => 'text',
'title' => 'Text',
'description' => 'Type something here.', #description that will be placed below the input field
),
array( // Text Area
'field_id' => 'my_textarea_field',
'type' => 'textarea',
'title' => 'Single Text Area',
'description' => 'Type a text string here.',
'default' => 'Hello World! This is set as the default string.', #default value
),
array( // Submit button
'field_id' => 'submit_button',
'type' => 'submit',
)
);
|
Xem Ví dụ sau đây:
|
class MyFirstPlugin extends AdminPageFramework {
public function setUp() {
$this->setRootMenuPage('Settings');
$this->addSubMenuItem(
array(
'title' => 'My form Page',
'page_slug' => 'my_form_page',
)
);
}
function load_my_form_page($oAdminPage){
$this->addSettingFields(
array( // Single text field
'field_id' => 'my_text_field',
'type' => 'text',
'title' => 'Text',
'description' => 'Type something here.', #description that will be placed below the input field
),
array( // Text Area
'field_id' => 'my_textarea_field',
'type' => 'textarea',
'title' => 'Single Text Area',
'description' => 'Type a text string here.',
'default' => 'Hello World! This is set as the default string.', #default value
),
array( // Submit button
'field_id' => 'submit_button',
'type' => 'submit',
)
);
}
}
if ( is_admin() ) {
new MyFirstPlugin;
}
|
Truy xuất giá trị trường:
Mặc định sử dụng tên class như option key, chẳng hạn trong ví dụ trên chúng ta có class 'MyFirstPlugin' với hàm get_option.
Ví dụ nếu bạn cần lấy giá trị của trường có id = 'my_text_field'.
|
//method 1
$data = get_option( 'MyFirstPlugin' ,array());
$value = isset( $data['my_text_field'] ) ? $data['my_text_field'] : $data['my_text_field'];
|
Biến $data là giá trị mảng sẽ chứa tên field (id) hoặc section IDs.
Bạn cũng có thể gọi hàm static getOption từ class AdminPageFramework để lấy giá trị trường:
|
//method 2
cho '<pre>my_text_field: ' . AdminPageFramework::getOption( 'MyFirstPlugin', 'my_text_field', 'default text value' ) . '</pre>';
echo '<pre>my_textarea_field: ' . AdminPageFramework::getOption( 'MyFirstPlugin', 'my_textarea_field', 'default text value' ) . '</pre>';
|
Chú ý: Nếu giá trị của option là giá trị mảng, bạn có thể lấy phần tử của item bởi chỉ số. Ví dụ sau lấy phần tử mảng ở vị trí 2:
|
AdminPageFramework::getOption( 'APF_CreateForm', array( 'my_first_section', 'my_text_field', 2), 'default' )
|
Tạo nhóm fields:
Sử dụng phương thức addSettingSections()
|
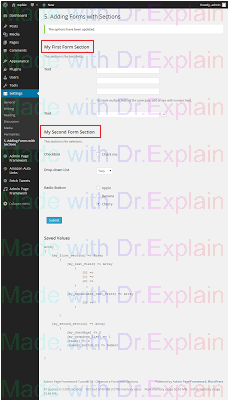
$this->addSettingSections(
'my_second_form', #page slug apply for
//section definition arrays
array(
'section_id' => 'my_first_section', #section id
'title' => 'My First Form Section',
'description' => 'This section is for text fields.',
),
array(
'section_id' => 'my_second_section',
'title' => 'My Second Form Section',
'description' => 'This section is for selectors.',
)
);
|
Truyền section ID vào tham số đầu tiên và phần định nghĩa trường ở các tham số tiếp theo.
|
$this->addSettingFields(
'my_first_section',
array(
'field_id' => 'my_text_field',
'type' => 'text',
'title' => 'Text',
'description' => 'To create multiple fields of the same type, add arrays with numeric keys.',
array(), // sub-field
array(), // sub-field
),
array(
'field_id' => 'my_repeatable_text_field',
'type' => 'text',
'title' => 'Text',
'repeatable' => true, #makes the field repeatable
)
);
$this->addSettingFields(
'my_second_section',
array(
'field_id' => 'my_checkbox',
'type' => 'checkbox',
'title' => __( 'Checkbox', 'admin-page-framework-demo' ),
'label' => __( 'Check me.', 'admin-page-framework-demo' ),
'default' => false,
),
array(
'field_id' => 'my_dropdown_list',
'title' => __( 'Drop-down List', 'admin-page-framework-demo' ),
'type' => 'select',
'default' => 1, // the index key of the label array below which yields 'Two'.
'label' => array(
0 => 'One',
1 => 'Two',
2 => 'Three',
),
),
array(
'field_id' => 'radio',
'title' => __( 'Radio Button', 'admin-page-framework-demo' ),
'type' => 'radio',
'label' => array(
'a' => 'Apple',
'b' => 'Banana',
'c' => 'Cherry'
),
'default' => 'c', // yields Cherry; its key is specified.
'after_label' => '<br />',
),
array( // Submit button
'field_id' => 'submit_button_b',
'type' => 'submit',
'show_title_column' => false, #hidden button title column mean align button to left bellow field label, see image in bellow:
)
);
|